Craft Shows: Pros, Cons, and Where to Start

Plaidypus craft fair gift show booth table

Whether you’re a new artist looking to get your business noticed or a veteran artist looking to expand your audience, craft fairs can work for you. Basically, you pay money for a booth or a table and set up shop for a day or a weekend to sell directly to customers, surrounded by other artists just like you.

Plaidypus participates in around four gift shows every year: Fort Collins’ Sustainable Living Fair, Wadoo’s Annual Holiday Trunk Show, The Colorado College Arts and Craft Fair, and the Lux Center Holiday Gift Show. Some years it’s more, some years it’s less, depending on how much time there is to make product and how stressful college (about to be grad school!) is.

I love the craft fair/gift show system for a number of reasons. First of all, people love knowing where their product is coming from, what it’s made of, etc. and you’re standing there able to answer all their questions. Second, you can charge retail price instead of wholesale price for your items (for more information on wholesale and retail pricing, check out “5 Easy Steps to Figure Out Wholesale and Retail Pricing“), which means more profit for your business! Finally, your name gets put in the program, on the website, and on your booth, so you’re getting some great publicity.

Here are the pros of craft fairs in a handy list:

Plaidypus table booth at colorado college arts and craft fair 2013

Here’s me telling a friend about a scarf made from sweater sleeves at the Colorado College Arts and Crafts Fair in 2013

Pros of Craft Fairs

1. Connect directly with customers

2. Charge retail pricing instead of wholesale

3. Publicity (even if you don’t make very much money!)

There are also some risks associated with craft fairs. You need to be able to sell enough of your product to pay for your booth fee and your travel expenses for it to be really worth it (unless you’re only going so that you can get your name out there. Then it’s still pretty good marketing/publicity!) Also be aware that many fairs are juried, meaning there is a group of people who decide which businesses get into the fair and which do not, meaning you won’t automatically get into a craft fair. Finally, remember that if your fair is a little further away, you have to take off time, find places to stay, and pay for gas or a flight to get there, which may add to your overhead and make it so you need to sell more (I definitely suggest beginning with local fairs!)

Here’s that list again in, well, list form:

Cons of Craft Fairs

1. Need to sell a lot to pay for the booth fee (booth fees that I’ve seen have ranged from $75 to $1000, depending on the popularity and location of the show, so have a maximum in mind for how much you will pay in case you don’t make the money back)

2. Many are juried

3. Travel expenses and time (plane tickets, gas, hotels, and time off)

So before you decide whether to do a craft fair, remember that sometimes you won’t make as much money as you would selling wholesale to a retail business (I’ll make a separate post about that, soon!). But also remember that it might still be worth it to get your business out there. And you may as well try at least one to see how it goes.

There are many local fairs that you can find that are easy to get to, don’t cost very much (many of them know that they get beginning artists in) and aren’t super big. If you are going to apply for craft fairs, look them up months ahead of time. If you want to do a Christmas craft show, start looking in July. That’s right, some get filled up that quickly. And even if they don’t, it’s good to know ahead of time when everything is due and what you’re going to need to apply. It gives you time to get your materials together and plan your season. Searching for craft fairs gift shows plaidypus blog

Finding craft fairs can be a little tricky. Most of the time I pretty much google “gift fairs” or “craft fairs” plus the area I’m looking to sell in. So, I live in Colorado, and I can look up “gift fairs Colorado” and sift through a lot of websites until I find one or two that I can apply for (even if they aren’t juried, you need to send in an application with descriptions and often photos of your product).

The other, more reliable way to find craft fairs is to know people who participate in them already. I personally know a lot of artists who make the majority of their profit from craft shows. I know most people probably don’t have those connections, but the longer you’re in the business, the more connections you will make within the craft world that can give you tips and tricks for your business and for craft shows. You may already know someone who knows someone, and that is a connection worth looking into. (Seriously, don’t worry about asking for help.)

Felted Wool Coffee Cup Cozy product description by plaidypus

You don’t have to describe it in this much detail. I would say, instead, “coffee cup cozies made from felted wool sweaters.”

There are a few things that almost every application asks for. Here’s a short list in case you want to have everything on hand ahead of time:

Craft Show Application Checklist

1. Product (know what you will sell and describe it)

2. Photos (take photos that show off the product well. Pretty photos are more likely to get you into a juried show)

Plaidypus recycled upcycled felted wool sweater coffee cup cozy

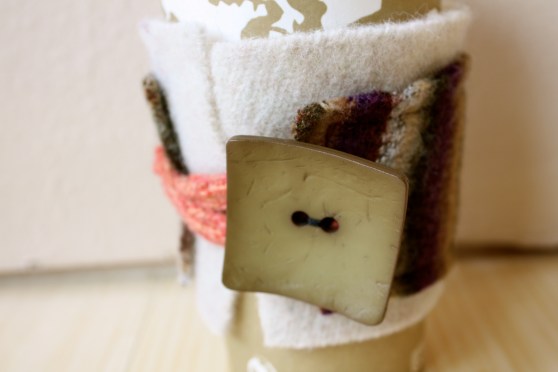
I might use this as my representative photo of a coffee cozy. It’s uncluttered and shows the item in use.

3. Fee budgets (know how much you can pay for booth fees and have that money ready)

4. Information about your business (name, address, phone number, general statement covering what it is you do, previous shows attended if any)

If you have these things, you should be good to go for most shows. Some may ask you to send in physical copies, including CDs with photos on them, while other will allow everything to be online. Try to find the fair with the highest turnout rate of customers within your budget, because the more people who attend the event, the more potential people to sell to.

And if you have any questions that I didn’t answer about craft fairs, comment and I’ll either edit this post or create a new one! Plaidypus and Wadoo Exhibitor Booth for Sustainable Living Fair 2011

How to Use Fabric Scraps: The Hair Clip

Felted Wool Sweater Blue Heart Hair Clip/Pin

I go through a lot of felted sweaters. Like, A LOT. I scrounge for wool sweaters at the ARC or Goodwill at least once every week from September until March (which according to thrifts stores is sweater season). I felt and cut up sweaters once every month or so and organize all my pattern pieces so they are easy to grab and use. My goal at this point is to throw away as little of the sweater as possible, so I’ve had to get creative over the years.

Plaidypus felted wool coffee cup cozy in the making

I started by only using sweaters to cut out patterns for my Coffee Cup Cozies. But there were all these parts left over. I began using the sleeves to make scarves, which helped ease my guilt, but I still felt like I was wasting some good scraps. I started looking online for small accessories I could create, and realized that hair clips were a worthy investment.

I found inspiration for the pattern I eventually made on the internet and at home.
After searching the web I found a few tutorials and photos that I really liked and tried to figure out why I liked them. For example, Here’s one that I liked because of the layering effect they used.

I also had a few hair clips at home that friends and family had bought me over the years that added to my inspiration and designs. Inspiration really is everywhere. Plaidypus felted wool hair clip pin
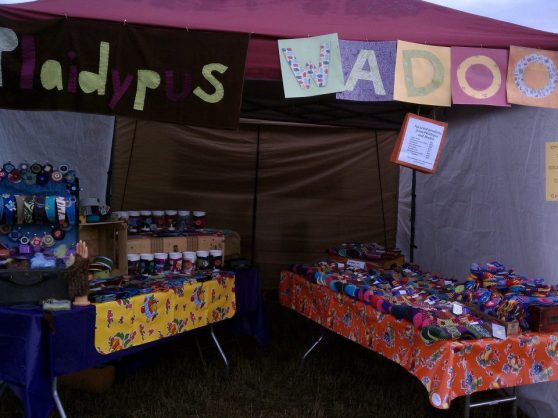
I knew I wanted layers and I knew I wanted buttons (because I like buttons on everything. Who doesn’t like buttons?) so I messed around until I made something I liked and then stuck with that and made a bunch more.

Because I was just using up scraps that I would have thrown away otherwise, I was keeping costs low and could therefore keep the price lower for customers. Also, I felt better about not throwing away so much good wool (because wool is getting harder and harder to come by as acrylic and acrylic blends take over the sweater market).

If you don’t use sweaters, you can still make hair clips or pins out of other scrap materials you have laying around. I also use a lot of t-shirts and end up with a lot of scraps from that and I’ve been thinking about making hair clips from those scraps as well. A lot of people have scraps from quilting or sewing projects, and those can be made into hair clips just as easily. Here’s a website with a bunch of great collection of hair bow ideas that you can make with your fabric, yarn, and ribbon scraps.

Scrap yarn crochet flower headband featured on Plaidypus blogScrap fabric hair bows featured on Plaidypus blogScrap fabric hair flower bow headband featured on Plaidypus blog


Bonus: Plaidypus pink and purple felted wool sweater hair clipHere’s one of the first hair clips I ever made combined with the moment I realized how difficult it was to take photos of myself with an SLR camera. At least my hair looked fabulous.


Using those old T-shirts: 7 Websites with Fabulous Tutorials and Inspiration to Help You Use That T-Shirt Stash

Pile of t-shirts

T-shirts are my favorite source of fabric. They’re colorful. They have patterns on them sometimes. They’re inexpensive. They’re plentiful and easy to find. They’re stretchy. And they don’t fray. That’s right, they’re practically magic. They’re great for clothing and quilts and accessories galore. If you’re more of a book kind of person, then check out the t-shirt books referenced in my previous blog post, 6 Books for Recycled/Upcycled Clothing and Accessory Patterns.

Sometimes I’m more of a website, girl, though. My poor bookshelf already bows down in the middle of every shelf. So the whole every-pattern-you-could-ever-want-is-on-the-web fact is one I love. All you have to do is type into Google whatever you want to look for and a million (most likely more) results will pop up for you to sift through.

I sifted through a few pages looking specifically at patterns and ideas that use old t-shirts, and found these for you. They’re all pages with bulk t-shirt ideas. Maybe I’ll come through and make another post with more specific projects.

1. Personal Creations

Toggle Bolero White T-shirt Upcycle PatternThis is a great website because it not only tells you what the item is and where to find the pattern, but also gives you a photo of the item! You can go through and find something you want to make and know what it will actually look like instead of hoping it’s nice when you get to the second linked page.

My inspiration from this website is the Bolero Pattern they show. Definitely going to have to make this one. The website they have this pattern on, by the way, also has some other fun ways to fashion a boring t-shirt.

2. Saved by Love Creations

Apron made from recycled/upcycled t-shirt by Ruffles and StuffAnother big bunch of t-shirt projects rolled into one page. There are so many to choose from! This site also puts photos next to all the titles and links.

My favorite one from this is the T-shirt Apron. It looks easy. And I’ve been needing an apron for a while now. maybe it’s time to actually make myself one!

3. Infarrantly Creative

recycled/upcycled ruffled front t-shirt topFirst of all, I had to look up the word “infarrantly.” Fun fact: it’s not a real word. Here’s what the site says:

“What is an Infarrantly?   Haha!   One of the #1 hits I get from my site from Google searches is “definition of infarrantly”.   Since I made the word up I suppose only I can give you the definition.   My last name is Farrant and I was playing on the word “inherently” which means something intrinsic, innate, basically born in me.   So I am inherently creative…infarrantly creative.   Get it? Smile

Now you know.

There are some great ideas for kid’s clothing and accessories on here as well as for adults. My fave from this site is the Ruffle Front Top.

4. Buzzfeed (that’s right, they have more than just quizzes and funny pictures)

Recycled/Upcycled t-shirt tunic/dress with cinched waist from large t-shirtI was surprised to see Buzzfeed had this cool of a post. But it did. I haven’t tried all the links, but it looks like at least some of them are tutorials. Some might just be a pretty picture. Which, by the way, is also helpful for inspirational purposes.

If you’ve clicked through all of these that I’ve posted you’ll start to see some repeats at this point. Pay no mind to those. They’ll happen if you hang out on the internet for more than an hour (if you’re like me and you’re searching for the perfect pattern, you’ve already been on the internet for at least that long.)

The thing I’m definitely going  to have to make here (and then see if it actually looks good on me) is the T-Shirt Dress with Cinched Waist.

5. Trash to Couture

Okay, not all of these are from old t-shirts. So sue me. They’re all recycled/upcycled basket woven t-shirt pattern/tutorialREALLY cool patterns, though. There are links and how-tos and everything. Some of them look pretty simple. Some look hard, but cool (maybe they aren’t hard. Maybe I’m just convinced that if there’s an intricate-looking pattern on something it’s difficult. You’ll have to try it and let me know).

I was really digging the Basket Woven Shirt idea they had going on. I put it on my long list of things to make.

6. Of Dreams and Seams

Of Dreams and Seams refashioned/recycled/upcycled t-shirt dressThis woman is amazing. Again, not everything she writes about is made out of t-shirts. But dang, this woman knows how to upcycle old clothing and make fabulous new clothing.

She does use a lot of t-shirts, though! Like this dress made from 3 old t-shirts. But there are also other cool things. Just click through her blog. I promise it’s worth it.


7. Julie Ann Art

Here are some cute accessory ideas for your old t-shirts. Some of them only need scraps. Which is good because you will end up with so many scraps from all the other patterns you’ve alrrecycled/upcycled t-shirt bow eady done from this post, right?

I’ve already decided I’m going to make this cute T-shirt Bow and put it on a headband. Or maybe as an appliqué for another t-shirt. I’ll figure out why I’m making it after I’ve made it.

The Headband: For Those of Us Who Don’t Want to Let Our Hair Down

Plaidypus upcycled t-shirt headband - Purple with black and purple buttons

Yes, you can let your hair down. Or you can put it up. It’s really up to you. But if you want a way to put it up (because it’s summer and it’s hot and if you have long hair you probably get that thing where your hair sticks to your forehead when you’re outside and it feels uncomfortable), there are a lot of options out there right now in the fashion world.

For one, headbands are coming back. I’m not sure if they ever actually left, but suddenly I’m seeing a lot more of them around here. I personally like the bigger, thicker headbands because otherwise they get lost in my hair (I always have more hair than I think I do…)

You can make your own headbands by cutting up t-shirts and braiding them in cool ways (I’ve seen this, but never figured it out myself because braids with more than three strands confuse me), by sewing some pretty fabric to some elastic, or by covering a pre-made headband of any size with fabric. Heck, you can even embellish a pre-made headband until it looks nothing like it’s original form. Here’s a website/blog post that gives you some ideas and some tutorials if you have creative energy and time to kill.

If you would prefer to buy a handmade headband, well then you’ve Plaidypus upcycled t-shirt headband - Orange with rainbow lacecome to the right blog post! Plaidypus makes some lovely thick headbands from upcycled t-shirts. They come in many colors and textures and with many embellishments, and unlike many headbands, they don’t start to give you a headache after ten minutes of wearing them. Check them out in our Photo Gallery or on the Plaidypus Etsy Site.


5 Easy Steps to Figure Out Wholesale and Retail Pricing

When I started my business I had one product, my crocheted handwarmers. I had no idea what to sell them at, so I low-balled it. I low-balled it about 11 dollars less than I sell them for now. That is a BIG difference. My original price wasn’t even going to give me the profit I needed if I wanted to get paid minimum wage (which at the time had just risen to a whopping 7.25 per hour).

Dark blue and dark purple crochet handwarmers/fuzzy fingerless mittens

Nowadays I have a larger product line, and I’d like to think I’m getting better at pricing my products. Remember that prices can always be tweaked if, say, the price of your materials or the amount of money you need to survive changes. So this is just to get you started.

Step 1: Cost of Materials

First, you need to know how much your materials cost you.

As an example, I’ll talk about the hair clips I make from felted wool sweaters (because I know that I learn better through example.) Make a list of what you buy and how much it cost you. If you know the exact number, put that down. If not, then over-price things so you know you’re getting your money’s worth (but not too much, because we’re trying to start on the low end here).

Felted Wool Sweater Blue Heart Hair Clip/Pin

1. Hair clips from King Soopers ~2.50 for 10

2. Wool sweaters from the ARC ~5.00 per sweater (lets say I can get 10 out of one sweater once it has shrunk down from the felting process)

3. Buttons ~1.50 for 10 buttons

Total: 9.00 for 10 hair clips; 0.90 per each hair clip

Step 2: Your Time

Your time is worth some money, so figure out how long it took you to make your product and how much money you want for that time. My go-to for starters is 10 dollars per hour (because it’s a nice round number and may as well make the math easier for yourself.)

It takes me about 20 minutes to cut out all the pieces, piece them together, sew them, and attach the hair clip part. That’s 1/3 of an hour, so $3.33 per hair clip.

Step 3: The Wholesale Price

Calculate wholesale price for products

Now you have your materials and your time. Get out your calculator or pen and scratch paper and add those together. That’s your wholesale price (that’s right, it’s that easy). That covers your costs and gives you money for your time.

If that seems pricey, you can cut costs on time, cut costs on materials, or take less money per item. If you sell multiple types of products, maybe another product can get more money to compensate for your loss on this one.

My wholesale price for hair clips should be around $4.23. I round mine down to $4.00 when I sell wholesale to stores. Part of this is to keep the actual cost of the clip down for retail stores, and part of this is because I actually make these from the scraps of sweater I don’t use in my other products, and those sweater parts would be trash otherwise, so I don’t think as much about the sweater costs.

Step 4: The Retail Price

Outdoor Craft Fair

I’m a wholesaler. BUT! I also do craft fairs. Craft fairs are your opportunity to charge retail price for your items. Retail price is roughly twice the amount of your wholesale price. This is important at fairs, because you might also be trying to pay for your booth and your time sitting there trying to sell to people. You’re going to need that extra money.

You’re also not “paying” for a middle man (the retailer) to sell your items. That means you get ALL the money.

My retail price for my hair clips is $8.00. If you go to my online Etsy store, my hair clips are $8.00. If you visit a store that my hair clips reside, the price will probably be around $8.00 (retailers will sometimes charge a little more because of shipping charges they have to think about). And if you find me at a fair, my hair clips will cost $8.00.

Step 5: Make it the Optimal Price

Now you know where to start. But you should always remember that tweaking prices can help you. You have to think about how much your customers are willing to pay for your product. Maybe you can get more for a product than you’re charging, or maybe you have to drop the price just a little to get more people interested in it.

Finding the Optimal Price Graph/Image

I try to optimize my price by charging the most the customer is willing to pay. I don’t think I can get more than $8.00 for a hair clip unless I make it seriously cool, but when I started my handwarmers obviously were not living up to their pricing potential.

Take feedback from your direct customers and the stores you do business with. See what is selling well and if people think something is too much or whether they would pay more for it. See what other businesses that are similar to you are creating and what they price their items at (this is SUPER helpful).

Happy pricing!


If you have any questions, comments, or suggestions, leave a comment, or I have a nifty Contact Me page where you can leave your information and I can get back to you directly.

How to Drink Coffee in Style: The Coffee Cup Cozy

How to Drink Coffee in Style: The Coffee Cup Cozy

I know, I know, it’s summer and no one wants to be drinking scalding coffee, right? I thought that, too, until I realized that most people who drink coffee keep drinking coffee, even in the heat! Something about caffeine addiction or something.

Anyway, if you drink hot coffee, and you don’t want to touch the hot cup (because, let’s face it, you’re already consuming the stuff, so you may as well not double up on the heat), then why not try a coffee cup cozy? The ones I create are made of felted wool sweaters (the ugly ones, not the nice ones) and a pretty, big button.

If you’re local to Fort Collins, you can find these babies at Wadoo (in old town). If you live anywhere else, then feel free to order one on my etsy site! I can even try to do custom colors (assuming I can find the sweaters).